HandShake set up instructions
Project page and instruction videos
Details of the HandShake project and a video of the system in use are here: https://www.mattoppenheim.com/handshake/
I made some videos which complement these instructions.
How to download the code and install the system is here: https://youtu.be/FAy9pbkGqI4
How to operate the system is here: https://youtu.be/MSOVIbfd228
This site details how to set up and operate the system and complements the videos linked above. Have a look at the project page before reading these.
All of the code for this project can be found on my GitHub site: https://github.com/mattoppenheim/microbit_hand_shake
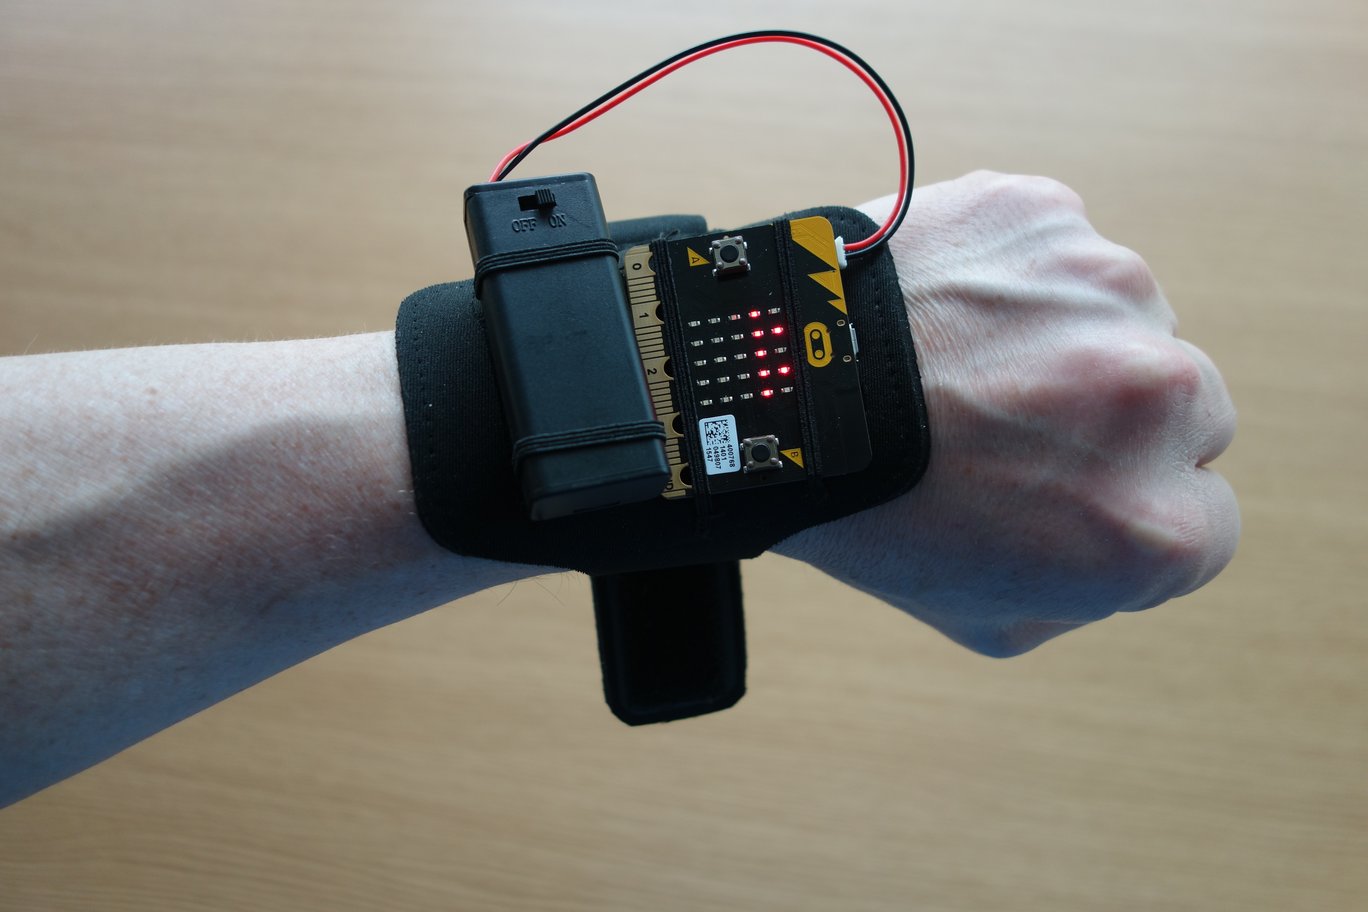
The HandShake system consists of two BBC micro:bit boards. One is a transmitter, which is worn on the user’s wrist. The second is the receiver, which is attached to the communication device using a micro USB cable. The transmitter detects a gesture and then communicates this to the receiver micro:bit. The receiver says ‘There’s been a gesture!’ to the communications device. Software running on the communications device then emulates the F1 (function key 1) being pressed and released. Grid 3 reacts to this as if a physical keyboard had just had the F1 key pressed and released.
The software that runs on the communication device runs on both Windows and Linux. I realise that the communications software in common use only runs on Windows. I would like it if communications software also ran on Linux, so the least I could do was make my system run on Linux. I don’t have a Mac to test the system with. This is on my ‘to do’ list.
Safety
The BBC micro:bit was designed to be safe to use in education with 11-12 year-olds, so has safety designed in.
The transmitter board is powered by two AAA batteries in a case. Normal safety practice should be followed with the batteries – keep them dry.
Parts
2 x BBC micro:bit boards
1 x AAA battery pack for a micro:bit board
1 x wrist holder
1 x micro USB cable to connect the receiver micro:bit to the communications device.
Wrist holder for a microbit and AAA battery pack
I tested out a bunch of phone and iPod armband holders. A couple of them can be used to secure a microbit and battery pack to your wrist.
Please see my webpage herefor more details.
Initially, I made my own, picture below. Details on how to make this using a £5 smartphone armband are here: https://www.mattoppenheim.com/introduction/bbc-microbit-wrist-holder/
How to set up the system-summary
The transmitter micro:bit goes on your wrist, the receiver micro:bit is connected to your PC or laptop computer using a micro USB cable.
Each of the micro:bits needs different code loaded onto it. The hex files can be drag and dropped onto each micro:bit through a file explorer to program them.
The transmitter is shaken. This shake sends a signal to the receiver. This causes the receiver to send a signal to the computer through the USB port.
A piece of software running on the computer detects this message and sends a keystroke out. This keystroke can be used to control communication software running on the computer.
How to connect the micro:bit to a Windows machine and load code
Hopefully, you can just plug the micro:bits into the Windows machine and they will be automagically detected. A folder called MICROBIT will appear in your File Explorer. Then you can drag and drop the .hex file containing the code for the micro:bit onto this folder and the board will load the code in about 10s, merrily flashing a little LED. Details below on what hex file goes where.
If you need more detailed instructions on how to connect a micro:bit to a Windows machine and how to load code onto it, please look at my blog post: https://www.mattoppenheim.com/2020/04/27/connecting-the-bbc-microbit-to-windows-and-adding-code-to-it/
Downloading the project code
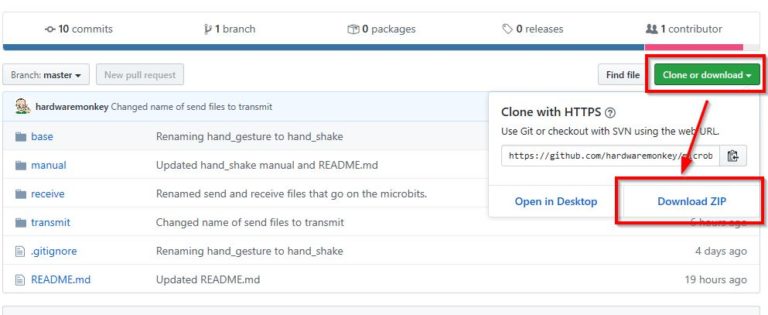
Go to the GitHub site linked at the top of the page. You can download each of the files detailed in the following sections by right clicking and doing ‘save-as’ or you can download the whole repository as a single zip file and unpack it on to your machine by clicking on the green ‘Clone or download’ button then selecting ‘Download ZIP’. See the picture below.
Programming the micro:bits with hex files
Each micro:bit needs to be programmed using a .hex file.
If you are interested, the code used to generate the hex file can be viewed in the Python script files, which end with a ‘.py’ suffix. You can ignore these .py files if you are just looking to get up and running as quickly as possible. These are included to enable anybody interested to be able to check the code and improve on it.
Connect the transmitter micro:bit to your computer.
The hex file for the transmitter micro:bit is called transmit.hex. This can be found in the transmit sub-directory on the GitHub site. I include the Python script (the .py file) used to generate the .hex file so anybody else can improve on it. You can ignore this .py file unless you are interested in looking at the code. Simply drag and drop the hex file onto the MICROBIT folder and it will load in about 10s, during which you will see an LED on the back of the micro:bit flashing.
Disconnect the transmitter micro:bit and connect the receiver micro:bit.
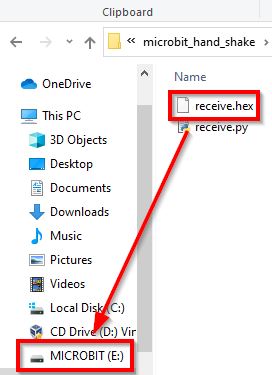
The code for the receiver micro:bit is called receive.hex. This can be downloaded by navigating to the receive sub-directory in hand_shake on the GitHub site, then right-clicking on the file and selecting ‘save as’. Drag and drop this onto the MICROBIT folder created when you connect the receiver micro:bit to the computer.
Program each of the micro:bits separately – only have one at a time plugged into your computer. Otherwise, the system can't tell which is which.
Installing the software onto your computer
The software that goes onto your computer is in the base folder of the GitHub directory. This stands for base station. I couldn’t think of a better name. This software monitors the attached receiver microbit for a trigger and then simulates pressing the F1 key on your keyboard. You can adjust the keystroke that is sent out when a shake is detected if you do not want to use F1. Details on how to do this are below.
Windows
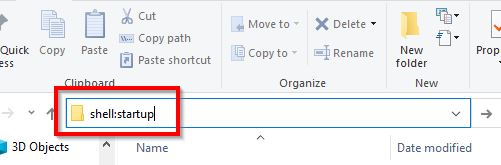
The file you need is called base.exe which is in the base directory of the GitHub repository. This is an executable. To have this automatically run when the computer starts, it needs to be placed in the Windows startup folder. To find this folder, type shell:startup in the File Explorer, as shown in the screenshot below.
Place the file called base.exe into the folder that typeing shell:startup took you to. After doing this, base.exe will automatically run when you start Windows.
Running base.exe
Double click on the base.exe program in a File Explorer to kick it off, or run it through a console.
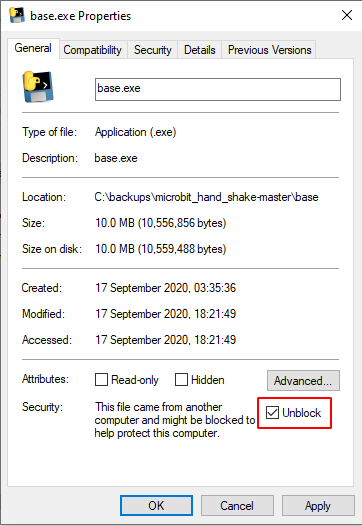
The first time that you try run the file base.exe, a warning screen ‘Windows protected your PC’ pops up and prevents you from running the software. This is a recent feature of Windows 10. You need to tell Windows that this is a friendly piece of software.
To do this:
Right click on the file base.exe and select ‘properties’:
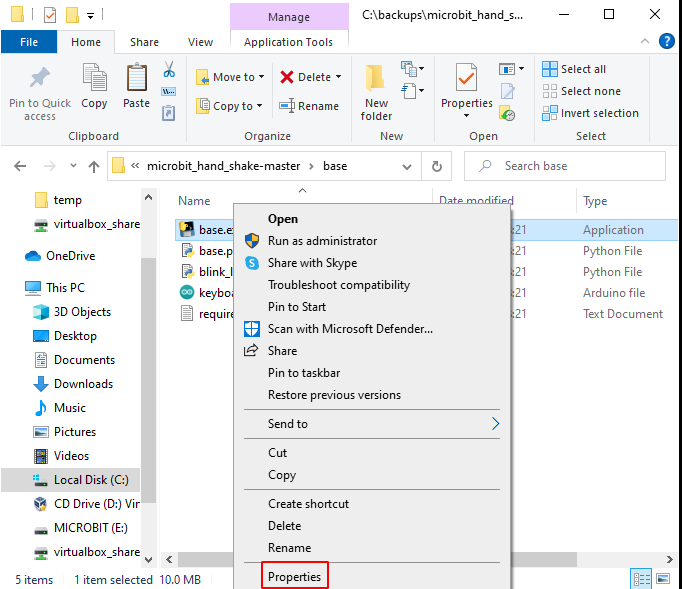
In the next menu, tick in the ‘unblock’ tick box:
When you next double click on base.exe, it will run without the warning window.
The receiver micro:bit can be plugged and unplugged without crashing the base.exe program when it is running. You can start the base.exe program with the receiver micro:bit plugged in or not plugged in. If the receiver is not plugged in, the program will wait for it to be plugged in and then continue. This is called being ‘hot-swappable’ and nobody is more surprised than me that I got this to work.
Generating other keystrokes
By default, F1 key presses are generated by the base.exe program. Other keystrokes can be sent instead.
By starting the program by typing e.g.
base.exe -k "1"
when the system is triggered, a keystroke 1 will be sent instead of the default F1.
To see the help for the command line options, from a console in the same directory as base.exe is stored, type:
base.exe --help
This will display help for the command line options:
Usage: base.exe [OPTIONS]

Options:
  -k, --keystroke TEXT  Keystroke to send. Default is "F1". e.g.
                        --keystroke="1" or -k "1"
  --help                Show this message and exit
Use
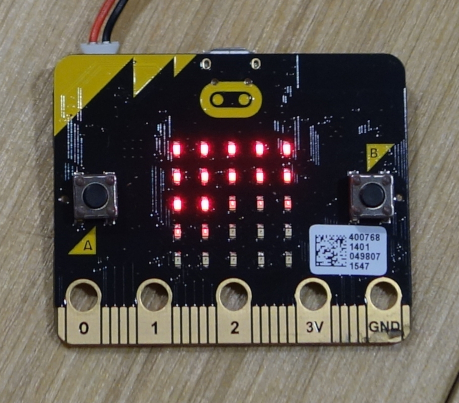
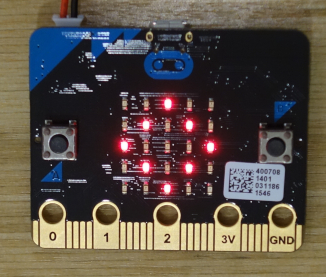
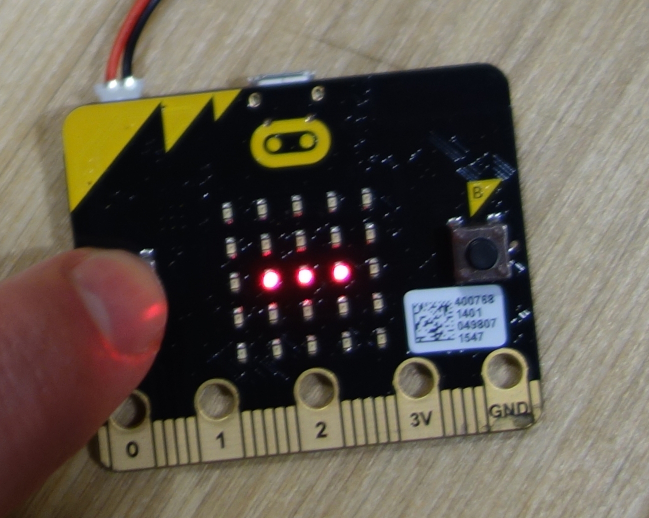
As you move the transmitter microbit, you will see bright LEDs light and turn off. The harder you shake the board, the more LEDs will light up. The LEDs go off as the motion of the board slows down. See the picture below. If you look closely at the transmitter board, you will also see some faint LEDs. The number of faint LEDs stays the same as you move the board around. The number of faint LEDs lit shows the sensitivity of the board. The more faint LEDs there are, the lower the sensitivity, so the harder the board has to be shaken to cause a trigger to be sent to the computer.

How to alter the shake detection sensitivity
The micro:bit has two buttons, labelled ‘a’ and ‘b’. You can alter the sensitivity of the system by using the buttons on either the transmitter or the receiver. Or both. This means that the transmitter can be in use and you can alter the shake detection threshold without having to interfere with whoever is using it.
Pushing the button labelled ‘a’ causes a ‘-‘ symbol to appear briefly on the transmitter’s LEDs. This makes it easier for a gentle shake to be detected. Each time you press the button a single faint LED will turn off and remain off and the sensitivity to a shake is increased.
Pushing the button labelled ‘b’ will make a ‘+’ symbol appear on the LED. This will make it harder for a gentle shake to be detected. Each time you press the button, a single faint LED will be lit and remain lit. You will need to shake the board harder to get it to trigger.

The micro:bit radio is set to use one of the 65,000 channel and group combinations available to it. Two micro:bit handshake systems could interfere. Fixing this interference requires changing a couple of lines of code in the transmitter and receiver scripts for one of the systems, to have it use a different channel or group. If you are using multiple handshake systems in the same area, send me an email and I will send out some code with a different channel and group configuration. Or, as the microbit is deployed to year 7 in UK schools – ask a friendly 12-year old to do this! All of the code is on the GitHub site; the link at the start of these instructions.
Contact
matt.oppenheim@gmail.com